PAGE 4
Exhaust system
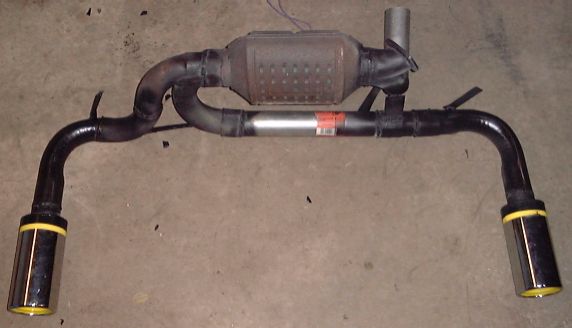
Since this vehicle was destined to a state that may test it for emissions, we decided to put on a catalytic converter. The catalytic converter we chose fits a 95-up full-size Chevy Truck with the Vortec 4.3L V6 engine. These cat's measure 3" in diameter inlet and outlet and were dyno tested a while back in a magazine and proven to out-flow most aftermarket high-flow catalytic converters. We used 2.5" mandrel bent tubing for most of the bends to increase exhaust flow. Since there wasn't any room for a muffler and a cat, the owner opted to use Monza Tips which have integral baffling to reduce sound. This exhaust system later proved, to our surprise, to be very quiet and effective.
Because of the potential for emissions tested, this vehicle also required an EGR to eventually be put on. Because of the custom exhaust system, a longer than stock EGR tube was needed. Stainless natural gas hookup line worked perfectly, as well as is flexible and durable enough to stand up to the high temperatures it will see during EGR operation.
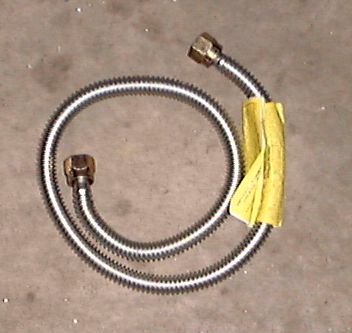
Here is a picture of the flare fitting welded to the rear exhaust dump pipe that allows connection of the EGR tube. A similar fitting was welded to the stock EGR tube flange that bolts to the LT1 intake.

PCM and Vehicle Wiring
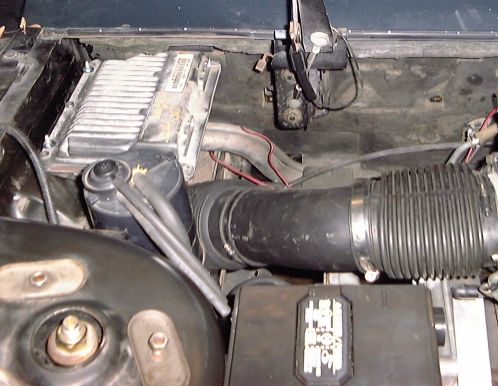
With the exhaust done, it was time to finish the PCM and vehicle wiring. I decided to mount the PCM over by the stock 2.8L air cleaner location since there was empty space there. Basically, the LT1 PCM gets hooked to the engine and vehicle in much the same way it would in the car it came from. The only exceptions were the connections to the transmission and cooling system. More on the transmission in a minute. Since we are running an electric water pump, I hooked the FAN1 output of the PCM to a relay that turns on the water pump. The stock Fiero cluster has a "hot" lamp which was hooked to the B+ wire between the fuse and the water pump. Any time the water pump is not on, either because the relay is not turning it on, or if the 20amp in-line fuse blows, the ground will feedback thru the pump and turn the hot light on inside the cluster. This is a nice feature because whenever the key is on and the engine is not running, or the engine is cold, the light should be on thus indicating "bulb test". If the coolant gauge begins to move past the 2nd small hash mark (140degrees) and the hot lamp does not turn off, then the indication is either the fuse is blown or the PCM is not turning the relay on. This is a nice safety feature. The FAN2 output of the PCM is connected directly to the coolant fan relay in the Fiero. The PCM is programmed to turn on the Water Pump at 140 degrees F and turn on the coolant fan at 185 degrees F. The coolant temp and gauge sender are both located in the cylinder heads thus this ensures they will always be sensing the hottest parts of the engine. Below is a pic of PCM mounting, later the PCM will get covered by a durable rubber mat to shield it from rain and water:
The PCM wiring to the transmission is accomplished by following the diagram I invented below:

I custom programmed this LT1 PCM to work with the 4T60-E's gear ratio and speed sensor to allow flawless shift points and performance for all vehicle operating modes. All irrelevant trouble codes have been disabled in the programming so any time the Check Engine light comes on it will signal a legitimate fault.
CV Drive Axles
Because the engine and transmission are shifted approx 1.75" to the left, this will require the use of custom axles. Actually, you will only need one custom axle made. First, lets talk about the easy one, the right side. The right side axle I used was out of a 92 Lumina with a 3.1 V6 and 4T60 transmission. You will need to change the outer tripod end, but you can use the one from a Fiero as long as it had the bigger inner shaft, such as those found on manual transmission equipped Fieros. After you pull back the CV boot and clean the grease away, you can access the single snap ring that holds the outer tripod end on. All you do it clean up and regrease the Fiero end and put it onto the shaft.
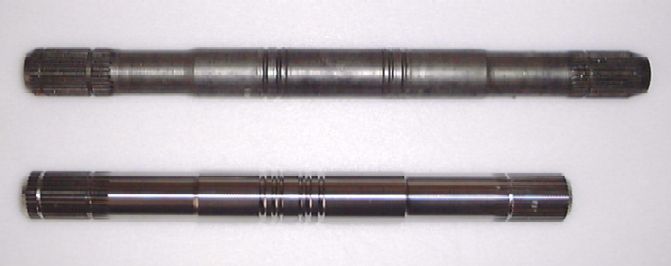
The left side is a little more difficult. This will require the use of a custom inner axle. Basically, you need to start with a 94 Beretta 3100/4T60-E left CV axle assembly, and have it shortened (or a custom piece made) to be approx 1.75" shorter. Most axles made by GM will not allow shortening of this much because the shaft is machined down for the rolling on of the splines so you may need to have a custom piece made. Here is a picture of the stock and custom axles. The shorter, shinier one was made by Moser Engineering for about $160.
Afterword
Well this swap was definitely a learning experience for all parties involved, especially myself. As of the time of this wiring, this is the only LT1/4T60-E powered Fiero that we know of. The owner of this car, "Mr. Pat", recently drove this car 820 from Iowa to his new home in Georgia. He reported no problems and average gas mileage of 25.3 miles per gallon. He says that he will try to get it on the dyno and to the 1/4 mile dragstrip soon. As soon as those numbers are reported to me, I will post them here. Should you have any questions about this swap, please feel free to contact me or Mr. Pat using the links below.
Home | LT1 Fiero Page | Email
02-02-2004