3800 specific engine swap info
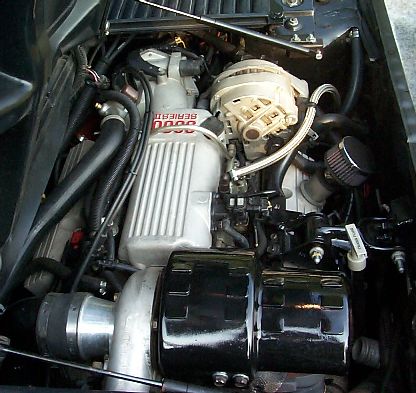
First, a little 3800 info:
The 3800 first appeared in 1988. It is virtually the same as the FWD Buick 3.8 with the exception of having the oil pump located in the timing cover and used DIS instead of a distributor. In 1992, the supercharged version appeared using a M62 blower. As far as I can tell, there was no difference between the Series I SC vin 1 engines and the 3800 TPI vin L engines except the connecting rods and possibly pistons. The cranks and heads are all the same, (except for balancing differences) according to my info.
In 1994-95 models, the 3800 I SC switched to teflon coated roots in the M62 blower increasing efficiency. PCMs also changed to an OBDII compatible format but remained OBDI with removable mem-cals which contain the PROM. There is programming available from www.tunercat.com for these PCMs.
In 1996, the 3800 SC engine changed to the series II design. A few things are different between the series I and series II engines which is worth mentioning for installation purposes. The series II engine has about a 1" shorter deck height than the series I. This makes the engine shorter and narrower allowing easier installation of exhaust and extra hood clearance as well as more room in the engine compartment overall. The heads are altogether different than the series I and also flow much better. Because of the shorter deck height, connecting rods are also shorter too, giving the 3800 Series II engine less reciprocating mass at the expense of rod-to-stroke ratio. The N/A 3800 II engine does not share the same rods or pistons with the SC version. The heads are the same with the exception that the N/A versions do not have the bosses drilled for the injectors. The 3800 Series II SC and N/A engines also feature cross-bolted, 4-bolt main bearing caps. The basically makes the need of a girdle unnecessary. The bottom end of the series II 3800 is very strong.
Nothing is interchangeable between the Series I and series II engines besides a few insignificant parts. The naturally asperated versions of the 3800 did not have internal parts designed for boost duty. While you can put boost on a naturally asperated engine, durability and reliability will not be as great as if you would have used the supercharged engine parts. To if you super- or turbo-charge a naturally asperated engine, DO SO AT YOUR OWN RISK.
Electrical Issues
The very first 3800 swap I did used a '92 Series I 3800 SC from a wrecked Park Avenue Ultra. I also kept the PCM and wiring as well as PASS-KEY module and ignition key resistor value for future use. For this first swap I did not yet have the ability to reprogram the stock chip. At first, we used a beefed 125-C trans but later swapped to the 4T60-E OD unit because we did not like the high revs the engine was spinning at on the highway.
The 92 PCM will work with the non-electronic 125-C, but this took some work. I had to wire in light bulbs on the shift solenoid circuits to give the PCM the illusion / simulated load that the shift solenoids were still there. I also had a problem with the gear selection switch because the 125-C is not compatible with the PRNDL position switch that the 4T60-E utilizes. I wired in a series of relays on the 4 PRNDL input wires to the PCM to "fool" it into thinking that the trans was either in Neutral or DRV 3. The PCM would see Neutral any time the P/N switch on the 125-C grounded in Park and Neutral, and DRIVE 3 anytime the trans was not in park or neutral. I had to do this to retain PCM control of TCC operation because the PCM will not activate TCC if it detects a "PRNDL" fault or sees what it thinks is TCC slippage. The 125-C's final drive of 2.84 was not fully compatible of what the PCM's PROM wanted to see (3.06~2.97) but was close enough as long as the PCM thought the trans was in DRIVE 3. More info on this can be found here: http://www.gmtuners.com/fiero/transbypass.htm
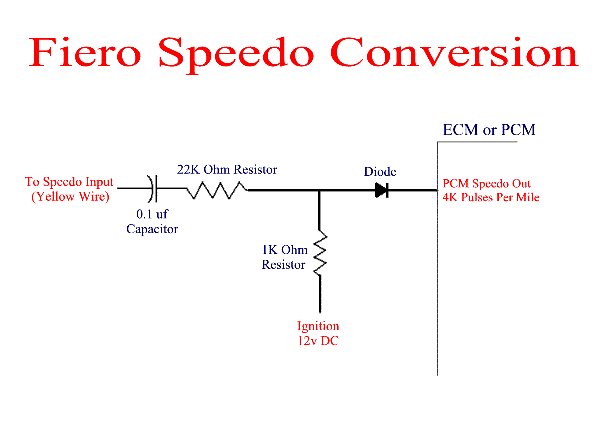
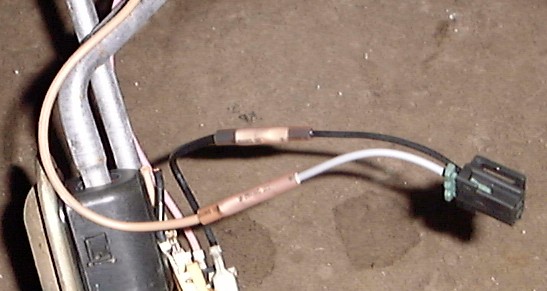
There was also an issue with the VSS sensor. The 92 PCM wants to see an analog, 30 Pulse Per Revolution (~24,000ppm) input that most 4T60-E's can supply. The stock Fiero VSS outputs a digital, 4,000 pulses per mile signal that will not work here. I had to use a 14 tooth reluctor from a 440-T4 and pressed it onto the 125-C's governor and used the later 125-C PM VSS governor cap. The new VSS hooked directly to the PCM, not the Speedo head. The PCM 4000ppm output from the PCM will feed the Fiero's stock speedo but you will need to build an interface to make it work like the one pictured below:
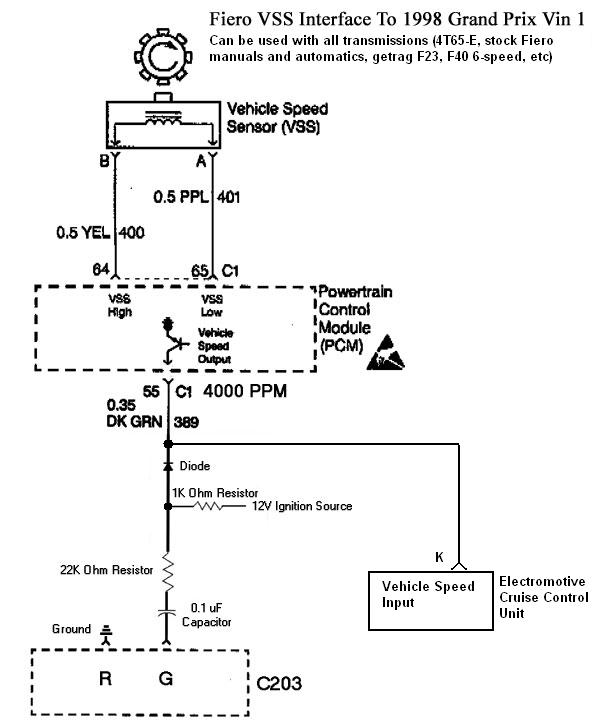
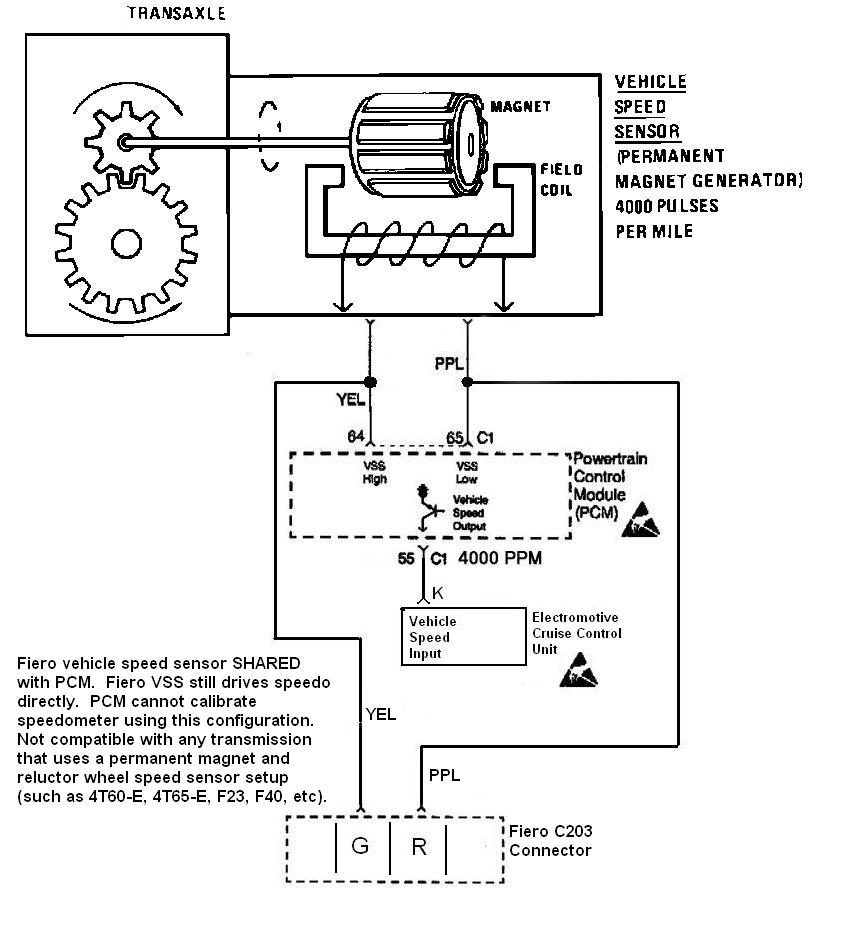
Of course, nowadays I can reprogram nearly all of the 3800 computers to work with any speed sensor you have. The below two diagrams further explain wiring hookup (and show pin ID's on 98-03 OBD2 PCMs)...
DIY Engine Mounting (84-87 Fiero)
The easiest, DIY mounting
solution
using factory available stock transmission mounts on the
drivers side of the 4T60-E. The only modification needed was the elongation
of the holes in the cradle to allow the trans to side to the driver's side ever
so slightly.
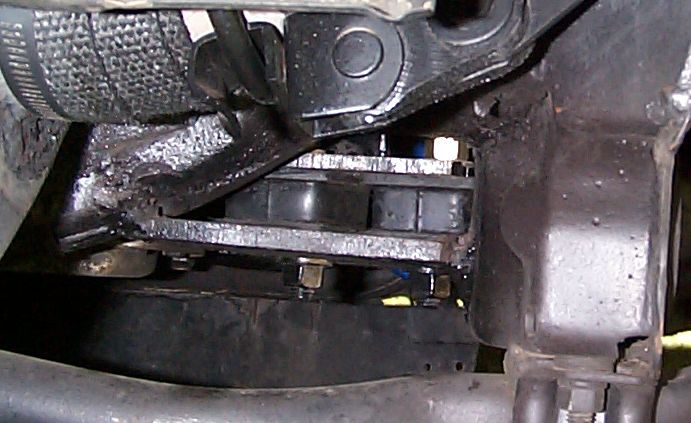
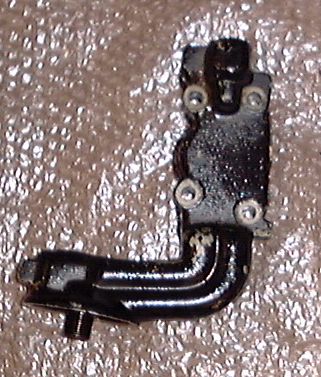
For the single bottom/front engine mount, here is what I have:
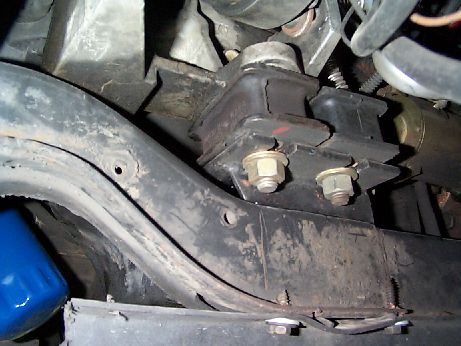
These rubber mounts are from a 75 Dodge Truck with a 318 V8, however, you may
elect to use the 79 Dodge truck mounts as they have a safety catch designed into
them. Both feature an offset stud on the top and bottom. I am using the
aluminum A/C compressor bracket from an 88 Buick LeSabre 3800 engine which
already has some extra meat cast into it to facilitate the mount bolting
locations. This bracket will need to be modified slightly (ground on) so it will
bolt to the series II block but it is no big deal. Most of these brackets don't
have holes drilled in them but even if they are already there you might have to
enlarge or drill new ones so you can position your mounts correctly. Some of the
casting was a little too thick for the studs on the mounts but a little grinding
of the bracket fixed this. The bottom piece was fabricated from 1/4" steel
plate and 1x1" mild steel box tubing. This gave me the proper mounting
height of the engine I needed. Obviously, you could use smaller stuff and make
the engine sit a little lower but the CV axles tend to get really close to the
cradle so I elected to keep it as low as I felt comfortable with which still
allowed me room to level the drive train out.
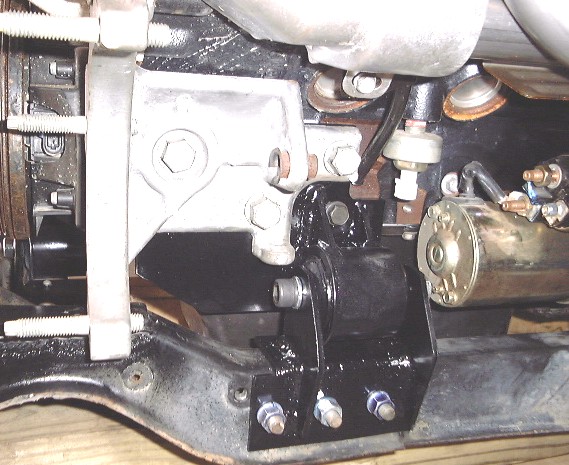
Next, you will see what I did with the rear passenger side transmission mount:
Here I used the same Dodge truck mounts but welded a plate to the bottom of a 95
Bonneville doggy bone mount (which bolts to the trans under the CV outlet) after
it was trimmed a little bit. It looks tight but you can get to all the nuts to
facilitate replacement or removal.
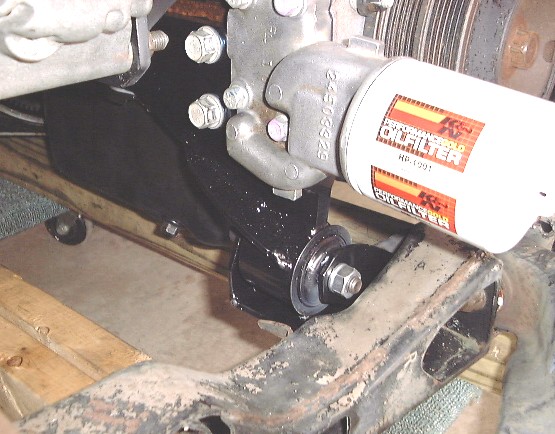
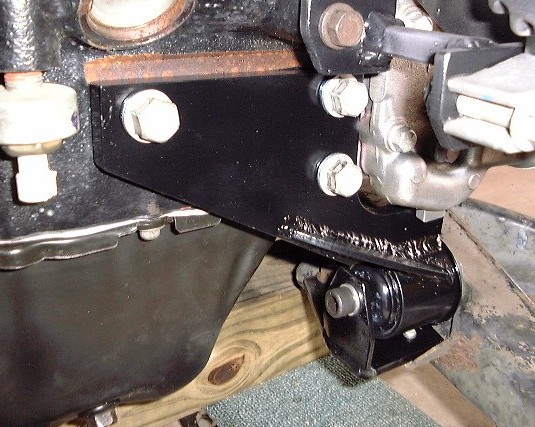
Finally, I added a engine support strut "dog bone" mount. You don't
need to do this but because I plan to put down some serious power with this car,
I felt the added rigidity would pay dividends later on:
Its kind of hard to see in this pic but I used a slightly modified engine strut
bracket from a 3300 V6. I modified it so it would not interfere with the 3800's
alternator support bracket, in fact, it now bolts to it. The strut mount is from
a 98 GTP and the big end has been totally cut off and shortened so it would fit
in the space I have allowed. Basically, the part of the strut mount that bolts
to the trunk wall is solid mounted via a single cross bolt which still allows it
to pivot. The front of the mount still has the rubber insert so there is a
slight amount of isolation present.

The end result is this is about as solid of mounting as you can get while still
using rubber. I think this has the added benefit of a moderate amount of
isolation while at the same time offering a high amount of strength. I purposely
doubled up the mounts because they were cheap and I didn't trust just one per
side especially with the amount of torque I am producing. If you would like more
pictures or info on this visit my Fiero page at:
http://www.gmtuners.com/87fiero
UPGRADED Engine Mounting (84-87 Fiero)
I have since invented a better (stronger and more reliable rubber mounting solution) since I wrote the above article. These new mounts use 84-87 Fiero front engine cradle bushings as the rubber mount. However, these bushings do require a bit more work/fabrication to use than off-the-shelf mounts. Pics of the "bullet-proof" rubber mounts are below:
![]()
![]()
CV Shafts -- both engines
(excluding 4T60E HD and 4T65E HD)
click here:
HOW-TO Build your own Custom CV Axles
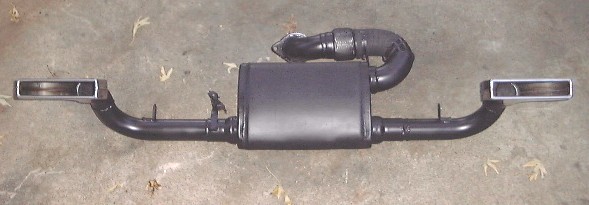
3800 Series II Exhaust
Below is an example of what I typically build for my 3800 swaps using stock exhaust manifolds. The one pictured works with the 1997-up Series II exhaust manifold. The 97-up rear manifolds do not have a swivel joint w/ doughnut gasket, rather they use a flat mounting flange and flex joint mounted in the exhaust downpipe. If you do not have a swivel joint on your manifold, you will need to purchase and install some kind of exhaust flex piece in the exhaust system.
Exhaust, Series I 3800
If you live in a state that looks for the cat to be in a stock location, forget about what I did and plan on spending a lot of time fabricating exhaust pieces. All 3800 I and II exhaust dumps out the back. There is just enough room between the flange of the series I manifold and the trunk heat shield to get an elbow in there. I welded a 90 degree bend to the rear exhaust flange that bolts to the rear 3800 header/manifold. Very tight here but it can be done. You can give yourself some more room and alternator-to-hood clearance if you space the rear cradle down about 1/2-3/4". I sawed a hockey puck in half and then drilled holes in them and simply inserted it between the existing cradle mount and the body. Might throw alignment and rear suspension geometry off a tad but I think the extra room was worth it. Now, back to the exhaust... With the 90 degree elbow on, the exhaust shoots over to the pass side where I welded in a 2.5" mandrel U-bend I ordered from Jegs. This will bring the exhaust right to the stock location muffler inlet. I am using a single outlet muffler so I don't know if it will clear a factory dual outlet unit's right side outlet pipe or not. Rest of exhaust mounts up in pretty much the stock location but it is very close to the truck's heat shield allowing the top of the muffler to just clear the exhaust dump from the 3800's manifold.
Cooling system
Some of my 3800 conversions were done in original 4-cyl, pre-88 cars and the stock 4cyl upper hose fit with slight modification to the hose. V6 cars require a slightly different hose, AutoZone p/n: XL-183 to connect the OE 3800 Series II's thermostat housing to the driver's side coolant tube. The bottom hose (Autozone p/n: XL-295) should work on both a V6 and 4-cyl car. No 2.8 or 2.5 water neck access cap unit was used. Instead, I fill the coolant in my 87 from the rear heater return line by the alternator in the bracket (because 87's have the heater return plumed directly into the radiator return line before the cradle). The 85 has no such pluming so I simply used a prestone access "T" there instead.
Wiring
I use the stock fiero harness in most cases but you will need to add some wires. If you have an automatic, here you will have an advantage because you will have an unused shift cable hole to run more wires thru. Basically, I used the fiero's harness for the injection, then added wires for the trans and PRNDL inputs as well as a few other items like the EGR and some injectors (because it is SFI not batch). I simply repined the fiero's stock ecm connectors so they would be correct for the PCM I was using and then just added wires and ran them thru the drilled out shift cable bracket grommet for the other stuff. Extensive work here, you better know how to solder and read wiring diagrams otherwise you might want to have someone else do the work.
Fuel System
I changed fuel pumps to the WalBro 307 units and used stainless, braded, rubber flex fuel line wherever needed to couple the existing fiero fuel system to the engine. The Walbro 307 has been superseded by the Walbro F20000169 pump. You can purchase this pump and a univeral 87-92 GM install kit from Precision Turbo and Engine for about $130.00. With this kit, this pump is a direct drop-in replacement for 87-88 Fieros. Earlier Fieros will require some in-tank rewiring as shown below. I recommend the use of crimp connectors with shrink tubing containing glue.
Returnless fuel rail system on a 3800 Series 2 or 3 SC (click here)
3800 compatibility with AUTOMATIC transmissions
There are many GM FWD transmissions that will bolt up to a 3800 engine with the exception of a few like those mated to Quad-4's. A problem you will run into with automatics is compatibility with the ECM. 92-93 ECMs want to see 2 shift solenoids, 2 TCC solenoids, and a 4-wire gearshift position sensor in a 4T60-E FWD auto. Most 94-96 PCMs want to see 2 shift solenoids, 2 TCC solenoids, 1 trans temp sensor, and the aforementioned gearshift sensor in a 4T60-E FWD auto. 3800 Series II OBDII PCMs that came on engines mated to 4T65-E transmissions will want to see the same as the 94-97 units plus they also control a Pressure Control Solenoid and will set codes if you hook them up to a trans without one. Likewise, you can't run a 4T65-E with a PCM that doesn't have a PCS output unless you get a separate stand alone controller. The PCS in the 65-E acts as a modulator and controls trans line pressure. In most cases, the 3800 PCM can be tuned to work with non-electronic automatic transmissions.
3800 compatibility with MANUAL transmissions
Most GM FWD manual transmissions will work but there might be an issue with PCM compatibility as well as finding clutch pieces. Other than that, the only thing one has to worry about is durability of the transmission as GM never designed a FWD type manual transmission to handle the torque output of a 3800 Series 2 Supercharged engine.
3800 MT swap - what flywheel?
If you are using a stock Fiero Muncie 4-speed or Getrag 5-speed manual transmission with a 3800 Series 2 or 3 engine, you can use a stock manual trans flywheel from a 1996-02 Camaro or Firebird 3800 Series 2 engine. However, the stock Camaro/Firebird 3800 flywheel will be far too thick to work with the FWD manual trans; so it must be milled down to an overall thickness of 0.810-0.840" so it will work. Keep in mind 3800 Series 2 and 3 engines are externally balanced, and there is an external offset balance weight cast into the flywheel. Supercharged versions of these engines have a different amount of external counter-balance weight than non-supercharged engines, so it is advised to have the flywheel balance-matched to the stock auto trans flexplate you take off of your supercharged engine to retain proper engine balance. I also recommend the use of brand new GM p/n: 24505092 flywheel to crankshaft mounting bolts. Torque them to 11 ft/lbs in the 1st pass + an additional 50 deg turn on the final pass (loctite can be used if you wish). These are torque-to-yield / single time use bolts and must be discarded upon removal. DO NOT attempt to reuse these bolts. I do not recommend the use of non-GM substitute bolts in this application unless you obtain the proper torque specifications from the bolt manufacturer. DO NOT use factory torque specs with non-factory bolts in this instance.
3800-compatible Oil Filter Adapters
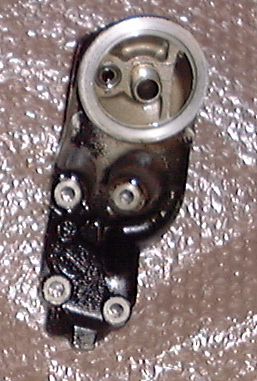
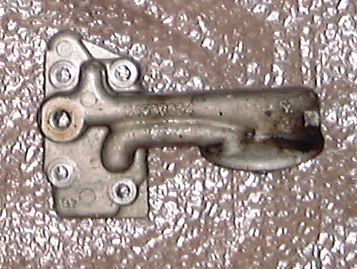
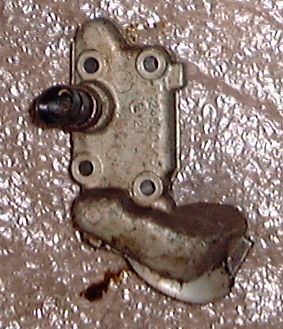
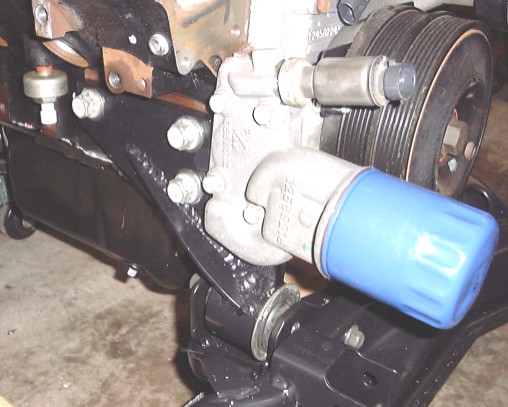
Below are some examples of the different oil filter adapters GM makes that will work with the 3800 Series I and II, as well as the 3300 and 3.0L V6 90 degree engines.
This adapter can be found on 85-87 N-body (Grand Am) cars on the 3.0L 90 degree V6 engine. This adapter will clear the 4T60/440T4 auto transmission (not tested on the 4T60-E or 65-E), and puts the oil filter right next to the oil drain plug. Because of ground clearance, only the PF47 (short) style oil filter can be used.
This adapter can be found on 3800 (series I and II) equipped w-body cars. This style routes the filter above the right CV axle.
This adapter can be found on some Full-size GM cars equipped with the 3800 engine. This design routes the filter right next to the crank balancer above the cradle frame rail. Because of space constraints, you may only be able to use the PF47 (short) style filter.
This adapter is most commonly found on H-body GM FWD cars like the 96 Olds Eighty-Eight. This design kicks the filter back towards the oil pan behind the balancer. This will work in the Fiero, however, if the use of the long style filter (PF52) is desired, you may need to cut away the left side cradle mount. If your exhaust is routed like the stock Fiero, you may also have issues in trying to use this adapter.
This oil filter adapter is from an F-body L36 3800. GM p/n: 12569217. Retail price is about $34. This adapter will offer plenty of clearance for most any Fiero swap although you may not be able to use the long PF52 oil filter due to clearance issues with the chassis frame rail.
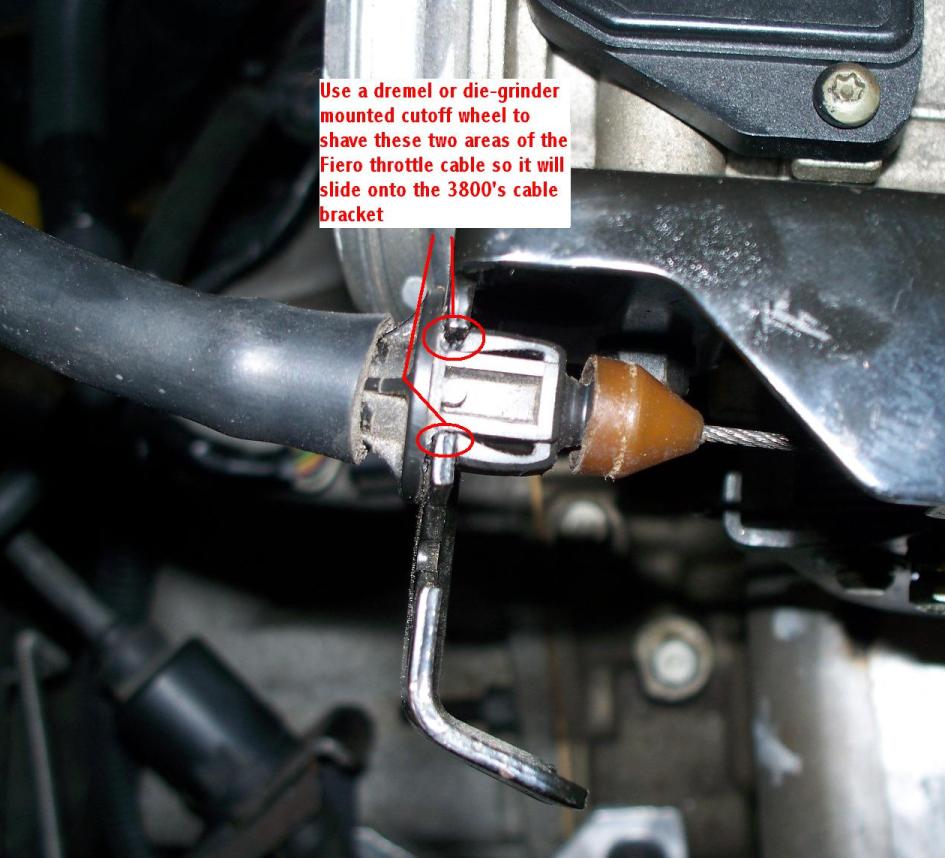
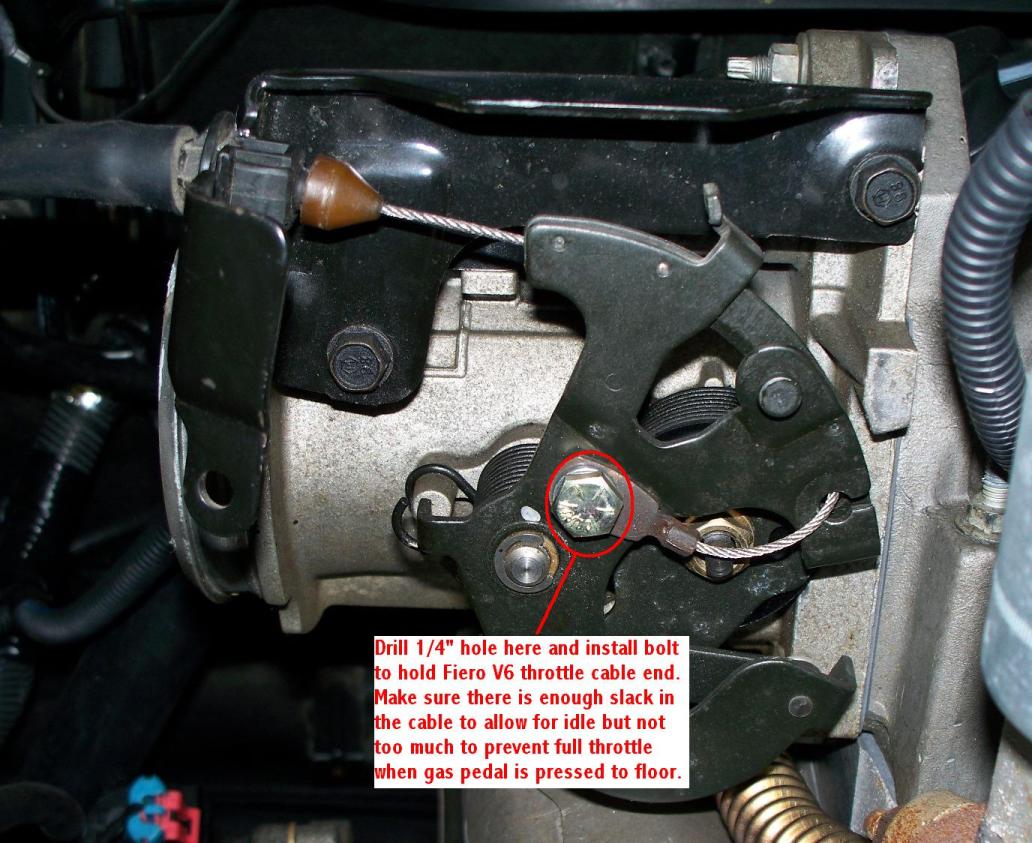
Throttle cable connection (using stock Fiero V6 throttle cable)

Spark Plugs
Stock 3800 Series 2 SC engines come with Delco 41-101 Iridium spark plugs. These plugs are of a pretty high heat range and should not be used for any kind of performance duty. AutoLite makes inexpensive copper and (a little more expensive) premium Iridium spark plugs for the 3800 Series 2 (and 3) engines in a variety of heat ranges. A chart with AutoLite part numbers is below...
| Heat Range | Copper P/N | Iridium P/N |
| Stock (HOT) | 606 | XP606 |
| 1 step colder | 605 | XP605 |
| 2 steps colder | 104 | XP104 |
| 3 steps colder | 103 | XP103 |
I do not recommend the use of Platinum Plugs of any brand be used in Supercharged or Turbocharged engines of any kind. Platinum tips are known to melt and blow off the spark plug's electrodes during extended full throttle runs in boosted engines. The blown-off Platinum tips can embed themselves between the piston and cylinder, causing damage. Iridium has a higher melting temperature than Platinum and thus will stand up to the heat better. Cheap copper plugs do work in boosted applications. But the copper electrode tips have less wear/erosion resistance than Platinum or Iridium; so they don't tend to last as long in boosted applications. Common problems associated with using copper plugs in boosted applications for too long usually first show up as random cylinder misfires. I've had copper plugs go bad in a Turbo 3800 application in as soon as 3,000 miles. A quality set of Iridium plugs will last 25,000 - 100,000 miles; depending on the application.