General Engine Swap Info
3.4 DOHC V6 specific swap info
Misc Fiero Engine Swap Part Numbers
HOW-TO Build your own CV Axles
84-87 Fiero Chassis Torque Specifications
85-88 Fiero Fuel Pump "HOT WIRE" Instructions
How to wire up a 1227730 ECM to your stock Fiero 2.8
How to wire up a 1227730 ECM and DIS using the stock Fiero V6 wiring harness
Returnless fuel rail setup for your L67 or L32 swap
Write-up on how to BYPASS electronic auto transmission controls in the PCM
91-93 3.4 TDC (DOHC) ECM Clutch Switch Wiring
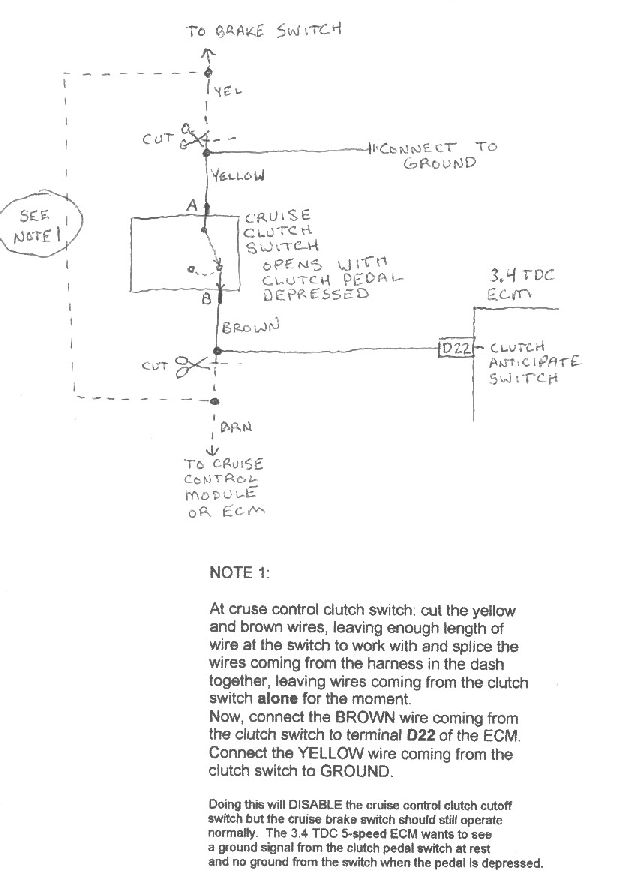
↑ This information pertains ONLY to the 3.4 TDC/DOHC 16149396 Computer.
EVAP Emissions System
If you do pretty much any engine swap and wish to retain the Fiero's EVAP system and keep it functioning, you'll probably need to install the EVAP purge solenoid that came with the donor engine that you're swapping into your Fiero. On the stock Fiero engine, the throttle body had a ported vacuum signal that controlled the Fiero's charcoal canister's purge function, mechanically. Newer engines usually lack these ported vacuum sources, so you will need to wire in an EVAP purge solenoid to control this function. The purge function is needed so the charcoal canister can be purged of stored gasoline vapors so it does not become saturated (which will quickly occur if it is not regularly purged). As the fuel heats (by daytime warming or by the engine running and the fuel circulating thru the fuel rails), the fuel vaporizes in the tank and this excess vapor must be dealt with - otherwise it would just leak out to the atmosphere causing a raw gas smell or could even create a dangerous situation if the car is stored in a sealed garage. Below is a vacuum diagram of how to hook up a computer-controlled EVAP purge solenoid to the existing Fiero charcoal canister.
Tachometer
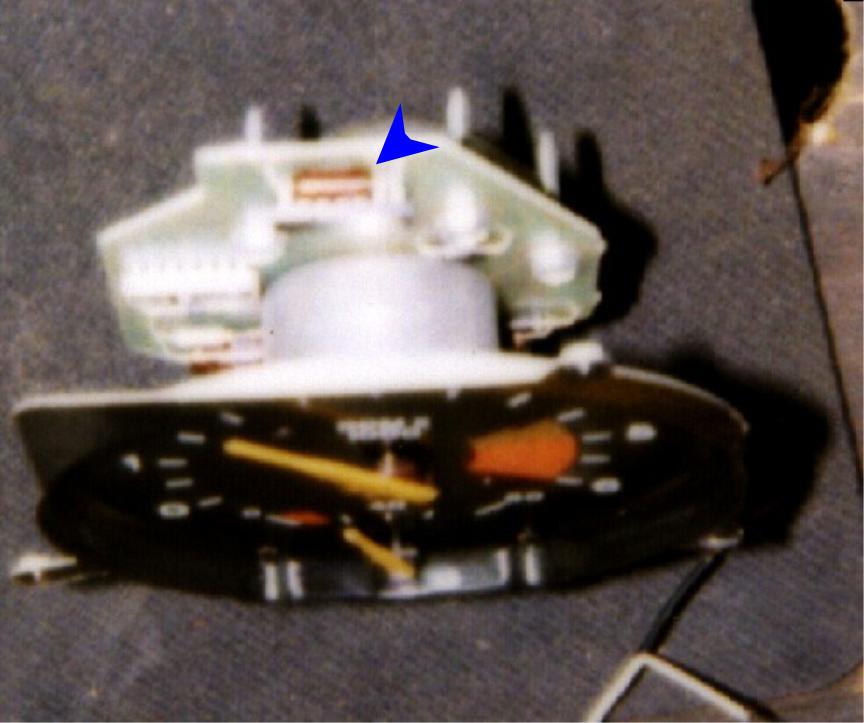
Finding a six-cylinder Fiero at a salvage yard can be difficult. Finding one that still has the parts you need is usually harder. So, I turned to some schematics of S-10 instrument clusters in which they had directions as to how to convert the factory tachometer to read correctly to an engine with different cylinders. This was accomplished by simply changing one of the capacitors on the tach circuit board to a different value. Shown below is a picture on the tachometer/oil pressure guage circuit removed from the cluster. The arrow is pointing to the capacitor that needs to be changed. The factory 4-cylinder tach reads 1/3 too much when hooked up to a six-cylinder. The value of the 4-cyl capacitor has a rating of .009uf. You need to replace this with a .006uf, 100 volt capacitor. This recalibrates the tach from a 4-cyl to a 6-cyl.
GT 120 mph Speedo
If you wish to use the GT-type cluster without adding the remote gauge pod that houses the oil pressure and voltmeter and sits on top of the radio console, but want a 120 mph speedo, you need to do some work. All 86-up GT's and those with the 120mph speedo's used a new backlit type design for night illumination. These post '86 clusters also did not incorporate an oil pressure gauge in the tachometer. 85 GT clusters looked very similar to the later 86-up clusters but were not backlit and were only offered with an 85mph speedo. You can install the 120 backlit speedo into the 85 cluster. During the day you will notice virtually no difference (if you change the pointer on the speedo), but at night it will not look right unless you wire in a few extra bulbs behind the other gauges. This will effectively brighten the whole cluster, making it easier to see in darkness.
